使用新的 Ansible 实用程序进行操作状态管理和修复
使用新的 Ansible 实用程序进行操作状态管理和修复
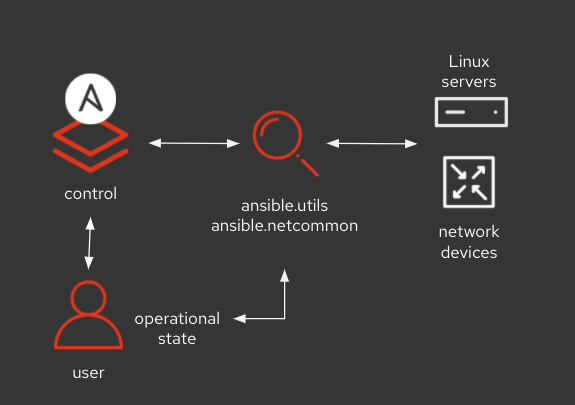
将 IT 基础设施的当前操作状态与您的期望状态进行比较是 IT 自动化的常见用例。这允许自动化用户识别漂移或问题场景以采取纠正措施,甚至主动识别和解决问题。这篇博文将介绍用于验证操作状态甚至自动修复问题的自动化工作流程。
我们将演示如何使用 Red Hat 支持和认证的 Ansible 内容来
- 从远程主机收集当前操作状态并将其转换为规范化的结构化数据。
- 以标准化格式定义期望状态标准,该标准可用于整个企业基础设施团队。
- 根据预定义标准验证当前状态数据,以识别是否存在任何偏差。
- 根据需要采取纠正修复措施。
- 根据数据模型架构验证输入数据
从远程主机收集状态数据
最近发布的 ansible.utils 1.0.0 版本集合添加了对 ansible.utils.cli_parse 模块的支持,该模块将文本数据转换为结构化的 JSON 格式。该模块能够在远程端点上执行命令并获取文本响应,或者读取控制节点上文件的文本以将其转换为结构化数据。此模块可以与传统的 Linux 服务器以及供应商设备(例如没有执行 Python 能力的网络设备)一起使用,并且该模块依赖于众所周知的文本解析器库进行此转换。当前支持的 CLI 解析器子插件引擎如下所示
- ansible.utils.textfsm 使用 textfsm python 库
- ansible.utils.ttp 使用 ttp python 库
- ansible.netcommon.native 使用 netcommon 内置解析器引擎
- ansible.netcommon.ntc_templates 使用 ntc_templates python 库
- ansible.netcommon.pyats 使用 pyats python 库
- ansible.utils.xml 使用 xmltodict python 库
- ansible.utils.json
本博文中描述的示例使用 Cisco 网络交换机,NXOS 版本 7.3(0)D1(1),作为远程端点,并在控制节点上运行 Ansible 版本 2.9.15,并且需要在控制节点上安装 ansible.utils、ansible.netcommon 和 cisco.nxos 集合。
以下 Ansible 代码片段 获取接口的操作状态并使用 **ansible.netcommon.pyats** 解析器将其转换为结构化数据。此解析需要在控制节点上安装 pyats 库。
---
- hosts: nxos
  connection: ansible.netcommon.network_cli
  gather_facts: false
  vars:
    ansible_network_os: cisco.nxos.nxos
    ansible_user: "changeme"
    ansible_password: "changeme"

  tasks:
  - name: "Fetch interface state and parse with pyats"
    ansible.utils.cli_parse:
      command: show interface
      parser:
        name: ansible.netcommon.pyats
    register: nxos_pyats_show_interface

  - name: print structured interface state data
    ansible.builtin.debug:
      msg: "{{ nxos_pyats_show_interface['parsed'] }}"
**ansible.utils.cli_parse** 任务中 **command** 选项的值是在远程主机上应执行的命令,或者,任务可以接受一个 **text** 选项,该选项直接以字符串格式接受值,并且可以在命令的响应已预先获取的情况下使用。**parser** 父选项下的 **name** 选项可以是上述任何一个解析器子插件。
运行 playbook 后,给定主机的 **ansible.utils.cli_parse** 任务的输出如下所示,供参考。
ok: [nxos] => {
   "changed": false,
   "parsed": {
       "Ethernet2/1": {
           "admin_state": "down",
           "auto_mdix": "off",
           "auto_negotiate": false,
           "bandwidth": 1000000,
           "beacon": "off"
           <--snip-->
       },
       "Ethernet2/10": {
           "admin_state": "down",
           "auto_mdix": "off",
           "auto_negotiate": false,
           "bandwidth": 1000000,
           "beacon": "off",
           <--snip-->
       }
   }
请注意,某些接口的 **admin_state** 密钥的值为 **down**,有关完整输出,请参阅 此处。
定义状态标准和验证
ansible.utils 集合添加了对 ansible.utils.validate 模块的支持,该模块根据验证引擎验证提供的标准的输入 JSON 数据。当前支持的验证引擎是 jsonschema,将来会根据需要添加对其他验证引擎的支持。
在上一节中,我们获取了接口状态并将其转换为结构化的 JSON 数据。假设如果我们希望所有接口的期望 admin 状态始终处于 **up** 状态,则 jsonschema 的标准 将如下所示
$cat criterias/nxos_show_interface_admin_criteria.json
{
        "type" : "object",
        "patternProperties": {
                "^.*": {
                        "type": "object",
                        "properties": {
                                "admin_state": {
                                        "type": "string",
                                        "pattern": "up"
                                }
                        }
                }
        }
定义资源期望状态的标准后,它可以与 **ansible.utils.validate** 模块一起使用,以检查资源的当前状态是否与期望状态匹配,如下面的 任务 所示。
- name: validate interface for admin state
  ansible.utils.validate:
    data: "{{ nxos_pyats_show_interface['parsed'] }}"
    criteria:
      - "{{ lookup('file',  './criterias/nxos_show_interface_admin_criteria.json') | from_json }}"
    engine: ansible.utils.jsonschema
  ignore_errors: true
  register: result

- name: print the interface names that does not satisfy the desired state
  ansible.builtin.debug:
    msg: "{{ item['data_path'].split('.')[0] }}"
  loop: "{{ result['errors'] }}"
  when: "'errors' in result"
**ansible.utils.validate** 任务的 **data** 选项接受 JSON 值,在本例中,它是从上面讨论的 **ansible.utils.cli_parse** 模块解析的输出。**engine** 选项的值是验证模块的子插件名称,即 ansible.utils.jsonschema,它标识要使用的底层验证库;在本例中,我们使用的是 **jsonschema** 库。**criteria** 选项的值可以是列表,并且应采用所用验证引擎定义的格式。为了运行上述 jsonschema,需要在控制节点上安装库。上述任务运行的输出将是一个错误列表,指示 admin 值不为 **up** 状态的接口。参考输出可以在 此处 查看(注意:输出将根据远程主机上接口的状态而有所不同)。
TASK [validate interface for admin state] ***********************************************************************************************************
fatal: [nxos02]: FAILED! => {"changed": false, "errors": [{"data_path": "Ethernet2/1.admin_state", "expected": "up", "found": "down", "json_path": "$.Ethernet2/1.admin_state", "message": "'down' does not match 'up'", "relative_schema": {"pattern": "up", "type": "string"}, "schema_path": "patternProperties.^.*.properties.admin_state.pattern", "validator": "pattern"}, {"data_path": "Ethernet2/10.admin_state", "expected": "up", "found": "down", "json_path": "$.Ethernet2/10.admin_state", "message": "'down' does not match 'up'", "relative_schema": {"pattern": "up", "type": "string"}, "schema_path": "patternProperties.^.*.properties.admin_state.pattern", "validator": "pattern"}], "msg": "Validation errors were found.\nAt 'patternProperties.^.*.properties.admin_state.pattern' 'down' does not match 'up'. \nAt 'patternProperties.^.*.properties.admin_state.pattern' 'down' does not match 'up'. \nAt 'patternProperties.^.*.properties.admin_state.pattern' 'down' does not match 'up'. "}
...ignoring
TASK [print the interface names that does not satisfy the desired state] ****************************************************************************
Monday 14 December 2020  11:05:38 +0530 (0:00:01.661)       0:00:28.676 *******
ok: [nxos] => {
   "msg": "Ethernet2/1"
}
ok: [nxos] => {
   "msg": "Ethernet2/10"
}

PLAY RECAP ******************************************************************************************************************************************
nxos                       : ok=4    changed=0    unreachable=0    failed=0    skipped=0    rescued=0    ignored=1
从以上输出可以看出,接口 **Ethernet2/1** 和 **Ethernet2/10** 不符合定义标准的期望状态。
修复
根据 **ansible.utils.validate** 任务的输出,可以使用 Ansible 模块进行配置管理和/或报告,采取多种修复措施。在本例中,我们将使用 cisco.nxos.nxos_interfaces 资源模块将给定接口配置为 admin **up** 状态,如下面的 代码片段 所示。
- name: Configure interface with drift in admin up state
  cisco.nxos.nxos_interfaces:
    config:
    - name: "{{ item['data_path'].split('.')[0] }}"
      enabled: true
  loop: "{{ result['errors'] }}"
  when: "'errors' in result"
此修复任务仅在先前任务的验证失败时执行,并且仅对 admin 状态不为 up 的接口运行。
数据验证
通常需要在将数据作为输入提供给任务之前对其进行验证,以确保输入数据结构符合预期的数据模型。这使我们能够在将配置推送到网络设备之前验证数据模型的一致性。此用例在 Ivan Pepelnjak 的 数据验证 博文中进行了说明。
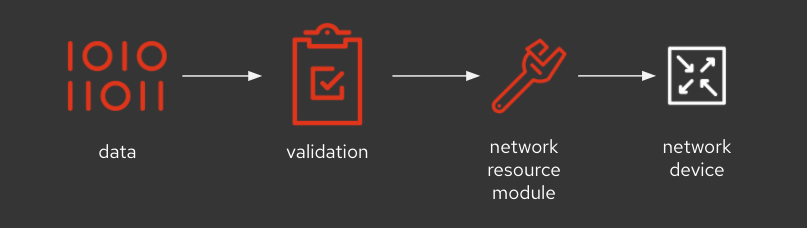
该博客使用命令行工具来验证输入数据,但是通过 **ansible.utils.validate** 模块的支持,此功能现在可以添加到 Ansible Playbook 本身中,如下面的 代码片段 所示。
- name: validate bgp data data with jsonschema bgp model criteria
  ansible.utils.validate:
    data: "{{ hostvars }}"
    criteria:
      - "{{ lookup('file', './bgp_data_model_criteria.json') |  from_json }}"
    engine: ansible.utils.jsonschema
  register: result
本地存储在 **bgp_data_model_criteria.json** 文件中的标准结构可以参阅 此处(来自 原始博客文章 的修改示例)以及以下示例 host_vars 文件
$cat host_vars/nxos.yaml
---
bgp_as: 0
description: Unexpected
上述任务运行的输出如下所示
TASK [validate bgp data data with jsonschema bgp model criteria] *******************************************************************************************
fatal: [nxos]: FAILED! => {"changed": false, "errors": [{"data_path": "nxos.bgp_as", "expected": 1, "found": 0, "json_path": "$.nxos.bgp_as", "message": "0 is less than the minimum of 1", "relative_schema": {"maximum": 65535, "minimum": 1, "type": "number"}, "schema_path": "patternProperties..*.properties.bgp_as.minimum", "validator": "minimum"}], "msg": "Validation errors were found.\nAt 'patternProperties..*.properties.bgp_as.minimum' 0 is less than the minimum of 1. "}